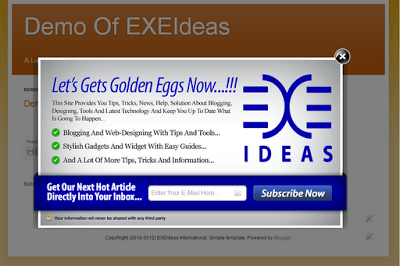
Since I Earlier Post About Version-1 That Is Also Beautiful But That Is Not More Similar To Original POP UP Domination But Now This Version Is 99.99% Similar To Original POP UP Domination.It Will Increase Your Subscriber More then Version-1. Awesome EXE-Style POP-UP V2 Is A Stylish Design J-Query POP Ups With Color Box Coding And Without Having Borders Which Nearly 99.99% Same As POP UP Domination.
It Will Attract Your Subscriber Too And Force Them To Subscribe Your Beautiful Updates. This is a POP UP Domination For Blogger And Website. You Are On That Page Where You Are Going To Get POP UP Domination For Blogger And Website Not WordPress.
Demo:
See The ScreenShoot For DEMO.
Features:
1.) UnBlockable-POP UP With LightBox Effect.
2.) Beautiful Themes
3.) Works With Feed Burner:
4.) Target Your Audience:
5.) Subscriber Increase Guarantee.
6.) Quick To Load And Easy To Install.
7.) PSD File Included.
9.) Without Borders And 99.99% Similar To POP UP Domination.
10.) One Time POPUp Upon Your Desire.
11.) You Have Full Controll When To Show Up This POPUP Again To Your Visitor.
12.) You Are Using Visitor Cookies To Controll Your POPUP.
1.) Go To Your www.blogger.com
2.) Open Your Desire Blog.
3.) Go To Layout.
4.) Click “Add A Gadget” Where You Want To Add It.
5.) Now Scroll To “HTML-JAVASCRIPT”
6.) Click “+” Icon To Add It.
7.) Now Copy The Below Code And Paste It To There.
8.) Leave The Title Empty.
9.) Click Save, Now You Are Done.
How To Add In Website?
1.) Just Go To Your HTML File.
2.) Now Copy The Below Code And Paste It Between <body> </body>.
3.) Save It, Now You Are Done.
<!-- This Is A Copyrighted "EXE Style POP UP" Widget, Don't Try To Theft It Otherwise... --><script src='https://ajax.googleapis.com/ajax/libs/jquery/1.6.1/jquery.min.js'></script><script src="https://raw.github.com/EXEIdeas/JS/master/ColorBox-v1.3.16"></script><script type="text/javascript">jQuery(document).ready(function(){if (document.cookie.indexOf('visited=true') == -1){var fifteenDays = 1000*60*60*24*30;var expires = new Date((new Date()).valueOf() + fifteenDays);document.cookie = "visited=true;expires=" + expires.toUTCString();$.colorbox({width:"800px", inline:true, href:"#exestylepopups"});}});</script><style type="text/css">/*ColorBox v1.3.16(Copyright (c) 2011 Jack Moore - jack@colorpowered.com)UpDated By www.exeideas.com(Copyright (c) 2011 EXEIdeas International - admin@exeideas.tk)*/#colorbox, #cboxOverlay, #cboxWrapper{position:absolute; top:0; left:0; z-index:9999; overflow:hidden;}#cboxOverlay{position:fixed; width:100%; height:100%;}#cboxContent{position:relative;}#cboxLoadedContent{overflow:auto;}#cboxLoadingOverlay, #cboxLoadingGraphic{position:absolute; top:0; left:0; width:100%;}.cboxPhoto{float:left; margin:auto; border:0; display:block;}.cboxIframe{width:100%; height:100%; display:block; border:0;}#cboxOverlay{background:#000;opacity:0.5 !important;}#cboxTopCenter{height:35px;}#cboxMiddleRight{width:0px;}#cboxContent{overflow:visible;}#cboxLoadedContent{margin-bottom:5px;}#cboxLoadingOverlay{background:url(https://2.bp.blogspot.com/-bMneOFi_UDo/Txohpge3Z9I/AAAAAAAAF0s/AbVgxX9pXtQ/s400/loadingbackground.png) no-repeat center center;}#cboxLoadingGraphic{background:url(https://3.bp.blogspot.com/-SKktU1-SCCw/TxohpRB19LI/AAAAAAAAF0Y/iwIo3LnjoE0/s400/loading.gif) no-repeat center center;}#cboxCurrent{position:absolute; bottom:-25px; left:58px; font-weight:bold; color:#7C7C7C;}#cboxClose{position:absolute; bottom:420px; right:0; cursor:pointer; background:url(https://lh3.googleusercontent.com/-MDJ02M999ME/T7dTe0GcQsI/AAAAAAAACKw/iyYQ4zS62N4/s40/exestylepopupclosebutton.png) no-repeat; width:40px; height:40px; text-indent:-9999px;}#cboxClose.hover{opacity:0.8 !important;}#exestylepopup{overflow:none; background-image: url(https://lh6.googleusercontent.com/-aBRfoLq36Y4/T8B3kEdp9yI/AAAAAAAACOg/tKMQhxmfBL8/s793/EXEIdeasBlog.png) ; background-repeat: no-repeat; height: 433px; width: 793px; }form#exestylepopup{display:block; margin:0;}form#exestylepopup #exefield{padding:2px; position:absolute; top:329px; left:295px; width:200px; font-size:16px; border:none; background:transparent;}form#exestylepopup #exebutton{position:absolute; left:555px; top:323px; width:200px; height:40px; border:none; background:transparent;}</style><div style='display:none'><div id='exestylepopups' ><form id="exestylepopup" action="http://feedburner.google.com/fb/a/mailverify" method="post" target="popupwindow" onsubmit="window.open('http://feedburner.google.com/fb/a/mailverify?uri=EXEIdeas', 'popupwindow', 'scrollbars=yes, width=600, height=550'); return true">
<input type="hidden" value="EXEIdeas" name="uri"/><input type="text" id="exefield" name="email" value="" placeholder ="Enter Your E-Mail Here..." /><input type="hidden" name="loc" value="en_US" /><input type="image" src="https://img1.blogblog.com/img/blank.gif" id="exebutton" /></form></div></div><!-- This Is A Copyrighted "EXE Style POP UP" Widget, Don't Try To Theft It Otherwise... -->
Customization:
1.) Change Red Text With Your FeedBurner ID.
2.) Download The PSD File And Edit It Without Touching E-Mail Box And Subscribe Button Position And Save That Then Upload It On Your PIC Server And Change The Blue Link With Your Uploaded Image Link.(Don’t Try To Change Height And Width Of Full Image)
3.) It Will Not POP Up Again And Again On Every Reload Or Every Pages. To Review The Widget Just Delete Your Browser Cookies And Refresh The Page To See It Appearing Again.
4.) If You Want To Appear This Widget On Every Reload Of Your Visitor On Every Page, Just Change true To false
5.) This Widget Will Again POPUP On Your Viewer Desktop After 30 Day If He Is Not Clearing His Browser Cookies, If You Want To Minimize This Time, Just Change 30 From The Above Code To Your Desire Day Within 1 To 30.
6.) Save And Done..
Note: This Is A Copyright Widget, Don’t Try To Cheat.Feel Free To Share But With A Link To Here. See The DMCA CopyRight Logo In The Footer.


how to edit pds file…….
Go And Install “Adobe Photoshop”…
I was looking for a way to integrate it with an outside email list such as aWeber or MailChimp. It seems this is only for subscriptions for Feedburner, is this correct?
You Can Add It There Too If They Are Providing Form For Subscription Box. Can I See There Subscribe Box Code?