
AirPods, a wireless earbud developed and sold by Apple Inc. specially designed to connect Apple devices like iPhones, iPads, Apple Watches, and Macs. It uses Bluetooth technology to pair and sync with these devices. It comes with a small charging case that can hold multiple charges, and the AirPods themselves can last for several hours of use before needing to be recharged.
One of the standout features of AirPods is their ability to automatically pause and resume playback when they are removed and reinserted into the ear. They also have built-in microphones that allow users to make phone calls and use voice assistants like Siri without having to take out their phones.
Since 2016, there have been several new versions of AirPods, including the AirPods Pro, which feature active noise cancellation and a more secure, customizable fit. Let’s explore how to connect AirPods to MacBooks and other devices.
Table of Contents
How To Connect Airpods To Macbook?
Connecting to the iPhone is easy however connecting AirPods to MacBook needs a set of steps. Here are the steps to connect your AirPods to your MacBook.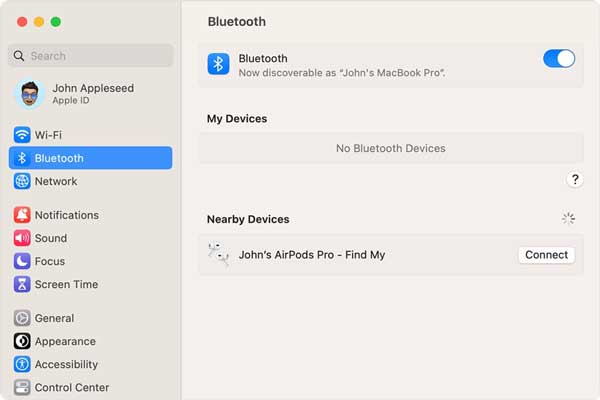
Step 1. Turn on Bluetooth on Your MacBook. You can do this by clicking on the Bluetooth icon in the menu bar at the top of the screen and selecting “Turn Bluetooth On.”
Step 2. Open the lid of the AirPods case and make sure the AirPods are charged and ready to use.
Step 3. Press and hold the button on the back of the AirPods case until the LED light on the front of the case starts flashing white. This puts the AirPods into pairing mode.
Step 4. On your MacBook, click on the Bluetooth icon in the menu bar and select “Open Bluetooth Preferences.”
Step 5. Your MacBook should automatically detect your AirPods and display them in the list of available Bluetooth devices. Click on the AirPods to connect them to your MacBook.
Step 6. If your AirPods don’t appear in the list, click the “+” button at the bottom left corner of the Bluetooth Preferences window to add a new device, then follow the prompts to pair your AirPods.
Once your AirPods are connected, you should hear a chime in the AirPods to indicate that they are connected to your MacBook. From then on, your AirPods should automatically connect to your MacBook whenever they are in range and Bluetooth is turned on. If you fail to connect your AirPods to your Mac, you can follow the troubleshooting steps to fix AirPods not connecting to Mac.
Sync Airpods To Macbook:
There is a difference between when you pair AirPods with Mac and when you sync AirPods with your Mac. Pairing is the initial process of connecting your AirPods to a device via Bluetooth. Syncing, on the other hand, refers to the process of ensuring that your AirPods are in sync with the audio or video playback on your device. Pairing is a one-time process while syncing comes into play every time you connect your AirPods to your device. To sync your AirPods to your MacBook, you will need to follow these steps.
Step 1. Ensure that your MacBook is running on the latest version of macOS.
Step 2. Place your AirPods in the charging case, and make sure they are charged.
Step 3. On your MacBook, click on the Apple menu, and select “System Preferences.”
Step 4. Click on the “Bluetooth” icon, which should be located near the top of the System Preferences window.
Step 5. Make sure that Bluetooth is turned on, and then open the lid of your AirPods case.
Step 6. Press and hold the small button on the back of the AirPods charging case until the LED light on the front of the case starts flashing white.
Step 7. Your MacBook should detect your AirPods automatically and display them in the list of available Bluetooth devices. Click on the “Connect” button next to your AirPods to pair them with your MacBook.
Step 8. Once your AirPods are synced, you should see a notification on your MacBook confirming that the connection has been established.
Step 9. You can now use your AirPods with your MacBook to listen to music, watch videos, and make phone calls.
“Note: Your AirPods will automatically connect to your MacBook whenever they are in range and Bluetooth is turned on.”
Connect Airpods To Iphone:
If you are connecting AirPods to your iPhone for the first time, you may follow these steps.
Step 1. Make sure your iPhone is turned on and unlocked.
Step 2. Open the lid of the AirPods case and make sure the AirPods are charged and ready to use.
Step 3. Hold the AirPods case close to your iPhone.
Step 4. A setup animation should appear on your iPhone screen. Tap “Connect.”
Step 5. If you have AirPods Pro, you will be prompted to set up the Active Noise Cancellation feature. Tap “Continue” and follow the prompts to complete the setup.
Step 6. Your AirPods should now be connected to your iPhone. If they do not connect automatically, you can connect them manually by going to the Control Center, tapping the “Audio” button, and selecting your AirPods from the list of available devices.
Once your AirPods are connected to your iPhone, you can use them to listen to music, take phone calls, and use Siri. They should automatically connect to your iPhone whenever they are in range and Bluetooth is turned on.
Connect Airpods To Apple Watch:
Connecting AirPods to Apple Watch can be a little more tricky than connecting connect AirPods to MacBook. Here are the steps to connect your AirPods to your Apple Watch.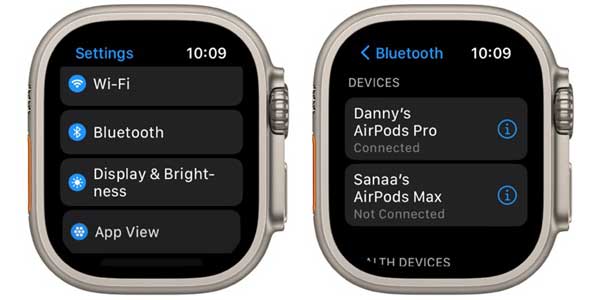
Step 1. Put your AirPods in your ears and make sure they are charged and ready to use.
Step 2. On your Apple Watch, swipe up from the bottom of the screen to open the Control Center.
Step 3. Tap the “AirPlay” icon (a triangle with concentric circles) at the bottom of the screen.
Step 4. Your AirPods should appear in the list of available devices. Tap on your AirPods to connect them to your Apple Watch.
Step 5. If your AirPods do not appear in the list of available devices, make sure they are within range and try resetting them by putting them back in the charging case for a few seconds, then taking them out again.
Step 6. Once your AirPods are connected to your Apple Watch, you can use them to listen to music, take phone calls, and use Siri. They should automatically connect to your Apple Watch whenever they are in range and Bluetooth is turned on.
“Note that if you have multiple Apple devices signed in to the same Apple ID, your AirPods may automatically switch between devices depending on which one you are using.”
Final Words:
This article on how to connect AirPods to MacBook has a step-by-step process to connect MacBook, iPhone, or Apple Watches. We have also mentioned how to sync and pair AirPods with Mac. These steps will help you connect AirPods to your Mac and always stay connected with your Apple devices.
 About the Author:
I am Janny Thomas, Tech Blogger from India. I love to research and publish about the latest technology and reviews on Windows and Mac products. Also write troubleshooting blogs like Airpods not connecting to Mac, WiFi network issues, Hard disk, Optimization, etc.


Your articles are greatly appreciated. And your topics are also wonderful, like every time a different one, which makes the mind very happy to read. I get to learn and know something new, you are requested to keep writing articles like this on different topics. I look forward to your blog. I have some blogs, if you want to read then you can click on the link given below.
Welcome here and thanks for reading our article and sharing your view. This will be very helpful to us to let us motivate to provide you with more awesome and valuable content from a different mind. Thanks again.
Thanks for post this blog its really good and informative blog
Welcome here and thanks for reading our article and sharing your view. This will be very helpful to us to let us motivate to provide you with more awesome and valuable content from a different mind. Thanks again.