

A sometimes overlooked, but useful feature of WooCommerce 1.5.3 is the included dummy data file, which can be imported to create a number of products, and even attaches product images! This is useful when setting up test/development environments and you want a range of products available without having to manually create them.
When you are making your own WooCommerce theme then you have to add some DEMO data to see all the CSS but it take time to make DEMO data and all its images then upload it with different text and names and here you are for designing a theme or setting a theme then why to waste time so here you can save time by just uploading the pre defined DEMO data by WooCommerce officially in plugin folder.
Table of Contents
Step 1 – Locate The Dummy Data File:
The sample data file is included with the woocommerce plugin. To verify you do indeed have it, look for dummy_data.xml in the woocommerce plugin directory: wp-content/plugins/woocommerce/. This file is simply a standard WordPress export file, and we will use the WordPress Importer to import it and fill up our store.
If you cant find this then go to https://github.com/woothemes/woocommerce/tree/master/dummy-data and download dummy_data.xml file from there.
Step 2 – Install The WordPress Importer:
From the WordPress admin, click on Tools > Import to bring up the import screen.
Click on the WordPress link at the bottom of the list, and if prompted install and activate the Importer plugin.
Step 3 – Load The Dummy Data File:
Click the file picker and navigate to and select the dummy_data.xml file from the WooCommerce plugin directory, and click ‘Upload file and import’. Next you will be presented with a screen with a couple of options: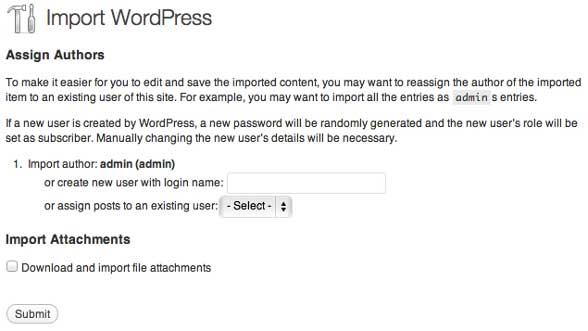
Select a user to assign the posts (products) to. Then check the box next to “Download and import file attachments”. Doing this will cause the importer to download the product images from the WooThemees server.
Step 4 – Enjoy:
Your store site should now be filled with sample products:
Now you can edit them too or go ahead what you was doing.
Last Words:
This is what we have and shared in easy steps for newbies so that they can easily know how it works. Stay with us because we are going to share a whole guide step by step about WordPress and make it easy for you. If you liked it then share it and be with us to get next tutorial. If you have any problem then feel free to ask us. We will help you with what we can or have.


Be the first to write a comment.