
If you’ve ever used a form on a website, chances are you’ve interacted with JavaScript. It’s the technology that makes things like buttons and drop-downs work. But what is it, and how does it work?
An event is an action taken by a browser or a user. The JavaScript concept of event handlers or listeners can be utilized to handle these events. A certain event triggers the execution of an event listener. One of these Event Listeners is onClick. When a user clicks on an element, an onClick event listener is triggered or executed.
If you need to change or assign a value to the onClick. For the attribute of a DOM element, you have two options; you can use either plain Javascript or the popular jQuery library. In this article, we’ll take a look at both methods and some common mistakes that are easy to make.
Table of Contents
What Is The JavaScript onClick Event?
JavaScript is a programming language that can be used to add interactivity to websites. The onClick event is one of the most commonly used events in JavaScript. It occurs when an element is clicked on.
For example, say you have a button on your website. When a user clicks that button, you can use the onClick event to do something. Maybe you want to display a message or redirect the user to another page. Whatever the case may be, the onClick event makes it possible.
To use the onClick event, you must add code to your website. Don’t worry if you’ve never coded before – we’ll walk you through it step by step.
How To Set onClick With JavaScript?
To set the onClick with JavaScript, there are two different methods, which are:
- The first method is to assign a value to the HTML element’s
onClickattribute using JavaScript. - The second method is to explicitly add an event listener on the HTML event which checks for the “click” event.
Example 1: Assign a Value To The HTML Element’s onClick Attribute Using JavaScript
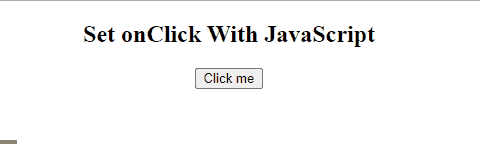
In the HTML file, create a heading and a button “Click me” with the id “js” which will trigger the JavaScript function while clicking on it.
<h2>Set onClick property With JavaScript</h2>
<button id="js">Click me</button>
In the following step, the created button will be accessed and an onClick attribute will be attached to it. Upon the button click, the specified function will be executed and the “style.backgroundColor” property will change the button color as follows:
document.getElementById("js").onclick = function jsFunc() {
    document.getElementById("js").style.backgroundColor = "Purple";
}
Example 2: Explicitly Add An Event Listener On The HTML Event
Create a button “Click here!” and assigns an id “event” to it that will trigger the “addEventListener()” method on the “click” event:
<button id="event">Click here!</button>
Fetch the button using its id and then attach an “addEventListener()” method by passing a “click” event and a function “eventFunc” where the background color of the button will be changed:
document.getElementById("event").addEventListener("click", eventFunc);
function eventFunc() {
    document.getElementById("event").style.backgroundColor = "Green";
}
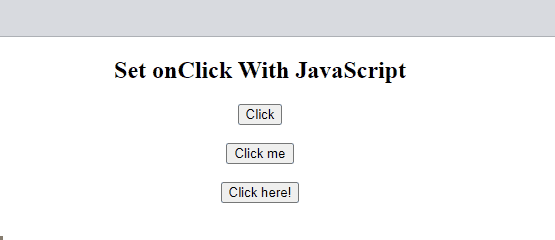
Final Example: Using All onClick Methods At Once
In this example, the working of all the methods will be displayed at once. First is the default way of adding the onClick attribute within the HTML tag itself. After that, the two methods of setting the onClick attribute with the help of JavaScript have been demonstrated as well.
In the following example, create three buttons and see the functionality of the onClick attribute.
- The first button “Click” will call the “htmlFunc()” on the click event.
- The button “Click me” will be accessed with its assigned id “js” and then assign a value to the button’s
onClickattribute using JavaScript. - The button “Click here!” will be accessed using the id “event” and then attach an “addEventListener()” method with it:
<button id="html" onclick="htmlFunc()">Click</button><br><br>
<button id="js">Click me</button><br><br>
<button id="event">Click here!</button>
The below function will trigger the onClick event of the button “Click”:
function htmlFunc() {
alert("The button clicked by HTML onClick event");
}
On clicking the “Click Me” button, the following function will trigger where a warning message will be displayed.
document.getElementById("js").onclick = function jsFunc() {
alert("The button clicked by JavaScript onClick function");
}
The given function will trigger the button “Click here!”:
document.getElementById("event").addEventListener("click", eventFunc);
function eventFunc() {
alert("The button clicked by JavaScript onClick with EventListener Method");
}
Conclusion
Be aware that you’ll want to put any DOM-modifying functions inside a function that executes when the DOM is ready to be manipulated. Otherwise, you’ll be attempting to modify DOM elements that don’t actually exist yet.
To set the onClick with JavaScript, there are two different approaches, the first is to assign a value to the HTML element’s onClick attribute using JavaScript and the second approach is to explicitly add an event listener on the HTML event which checks for the “click” event. This tutorial has defined the methods to set onClick with JavaScript along with examples.


Thanks for sharing this!
Welcome here and thanks for reading our article and sharing your view. This will be very helpful to us to let us motivate to provide you with more awesome and valuable content from a different mind. Thanks again.