
Sometimes we need to enable and disable input elements like text box, radio buttons, or checkboxes, to make it readable only or sometimes allow users to fill the form with their data but every time you make a change you need to reload the HTML? The question is, how can we do it dynamically without loading the page?
All you need to do is get the element by id and set its disabled property to true or false. You can do that when a user clicks on some button by calling a JavaScript function by using the onClick() attribute as shown in our first example.
There are many code snippets available online or on many other blogs and website but everyone is not able to optimize your blog or website so you need some optimized code snippet. So now checkout out code snippet for your blog and website that will give you all features for your desired code. Now grab the ready to use code and paste it where you want.
Table of Contents
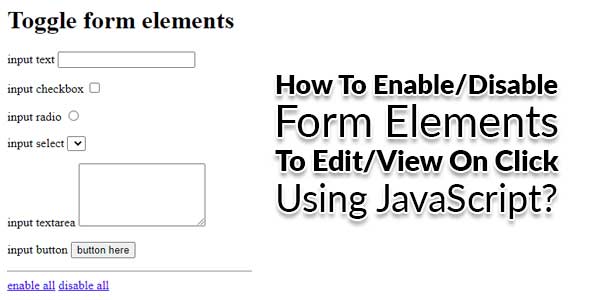
Enable/Disable Form Elements To Edit/View On Click Using JavaScript:
<script type="text/javascript">
function toggleFormElements(bDisabled) {
var inputs = document.getElementsByTagName("input");
for (var i = 0; i < inputs.length; i++) {
inputs[i].disabled = bDisabled;
}
var selects = document.getElementsByTagName("select");
for (var i = 0; i < selects.length; i++) {
selects[i].disabled = bDisabled;
}
var textareas = document.getElementsByTagName("textarea");
for (var i = 0; i < textareas.length; i++) {
textareas[i].disabled = bDisabled;
}
var buttons = document.getElementsByTagName("button");
for (var i = 0; i < buttons.length; i++) {
buttons[i].disabled = bDisabled;
}
}
</script>
How To Use It On A HTML Form?
Here is a DEMO example code about how to use it to allow users to edit the form or just view the values. In this example, we have an HTML form, text boxes, and a couple of buttons to enable and disable that text field. I am using plain JavaScript, no jQuery yet to accomplish the task.
<form method="post" name="form1" id="form1">
input text
<label>
<input type="text" id="textfield" name="textfield" />
</label>
<p>input checkbox
<label>
<input type="checkbox" id="checkbox" name="checkbox" />
</label>
</p>
<p>input radio
<label>
<input type="radio" value="radio" id="radio" name="radio" />
</label>
</p>
<p>input select
<label>
<select id="select" name="select">
</select>
</label>
</p>
<p>input textarea
<label>
<textarea rows="5" cols="45" id="textarea" name="textarea"></textarea>
</label>
</p>
<p>input button <button>button here</button></p>
<hr />

<a href="javascript:toggleFormElements(false);">enable all</a>
<a href="javascript:toggleFormElements(true);">disable all</a>

</form>
Customization:
Just use <a href="javascript:toggleFormElements(false);">enable all</a> or <span onClick="toggleFormElements(false);">enable all</span> from where you want to call the function. It will affect all elements on your page. To allow it to affect only one form on the page, you can edit it a little bit bypassing the form ID to it. Rest contact form more.
Troubleshooting the Errors
Do it with concentration and patience. Check your alls steps and again and all codes or scripts. If you find any error you can contact us anytime via comment or better via email, We are always here to help you.
Final Words:
That’s all we have. We hope that you liked this article. If you have any problem with this code in your template then feel free to contact us with a full explanation of your problem. We will reply to you as time allows us or If you have any doubts and problem please comment below. We are happy to help you! If you liked this article, Don’t forget to share this with your friends so they can also take benefit from it and leave your precious feedback in our comment form below. Happy development, See you in the next article.


Be the first to write a comment.