

It’s quite common to see calendar style dates next to some WordPress posts but for the Blogger platform it isn’t always an very easy task to add this. But who said you can’t do it? You need to look no further than this blog. In this tutorial, we’ll learn how to create a calendar style date for your Blogger posts.
Table of Contents
How To Create Calendar Style Dates In Blogger?
Step 1.) Go to Settings > Language and Formatting – Date Header Format and change the date format as you can see in my example below (put day first, then the month and finally the year)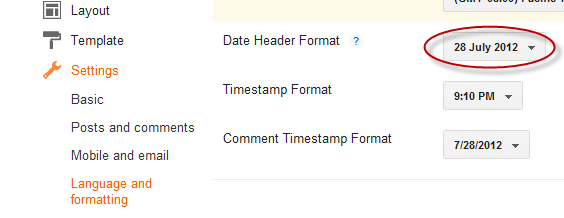
Step 2.) Then go to Template > Edit HTML.
Step 4.) And search CTRL+F the following line:
<h2 class='date-header'><span><data:post.dateHeader/></span></h2>
Step 5.) In case you find it twice, then you should replace it twice with this code:
<div id='Date'> <script>changeDate('<data:post.dateHeader/>');</script> </div> <b:else/> <div id='Date'> <script>changeDate('');</script> </div>
Step 6.) Now search for </head> to find it.
Step 7.) And paste the code from below just ABOVE the </head> tag:
<script type='text/javascript'>
//<![CDATA[
var DateCalendar;
function changeDate(d){
if (d == "") {
d = DateCalendar;
}
var da = d.split(' ');
day = "<strong class='date_day'>"+da[0]+"</strong>";
month = "<strong class='date_month'>"+da[1].slice(0,3)+"</strong>";
year = "<strong class='date_year'>"+da[2]+"</strong>";
document.write(month+day+year);
DateCalendar = d;
}
//]]>
</script>
<b:if cond='data:blog.pageType != "static_page"'>
<style type='text/css'>
/* Calendar style date
----------------------------------------------- */
#Date {
background: transparent url(http://1.bp.blogspot.com/-NVj6tUKJgLo/UBShW2dCLSI/AAAAAAAACZk/3TkTa8Hzqt0/s1600/calen dar07.png) no-repeat;
display: block;
width:60px;
height:60px;
float: left;
margin: 15px 2px 0 -108px;
padding: 0 0 8px 0px;
border: 0;
text-transform: uppercase;
}
.date_month {
display: block;
font-size: 15px;
font-weight:bold;
margin-top:-1px;
text-align:center;
color:#ffffff; /* Month's color */
}
.date_day {
display: block;
font-size: 28px;
font-weight:bold;
margin-top:-8px;
text-align:center;
color:#282828; /* Day's color */
}
.date_year {
display: block;
font-size: 10px;
margin-top:-8px;
text-align:center;
color:#282828; /* Year's color */
}
</style>
</b:if>Step 8.) Save and done.
Customization:
No need of basic customization. If you want to do then can edit CSS as per your desires.
Last Words:
Hope that this post will help you in understanding and Optimizing your blogger domain. To get more blogger tips and tricks kindly subscribe via email so that you may be notified when the posts were updated. If you found that any link is broken then inform me by giving your comments.Also If you need any help then you are free to ask…


Be the first to write a comment.