You know that WordPress comes with a handy features that will make your blogging life easy and worthy. Likewise other features, here we have another awesome features that will make your post editing easy in your WordPress blog.
Once you published a post then you can see in your Dashboard that what the category of this post is, what the tags of this post id, how many comment you got on this, whats the full title of this post is, who is the author, when it was published. These all features make you easy to know about basic of your previous post.
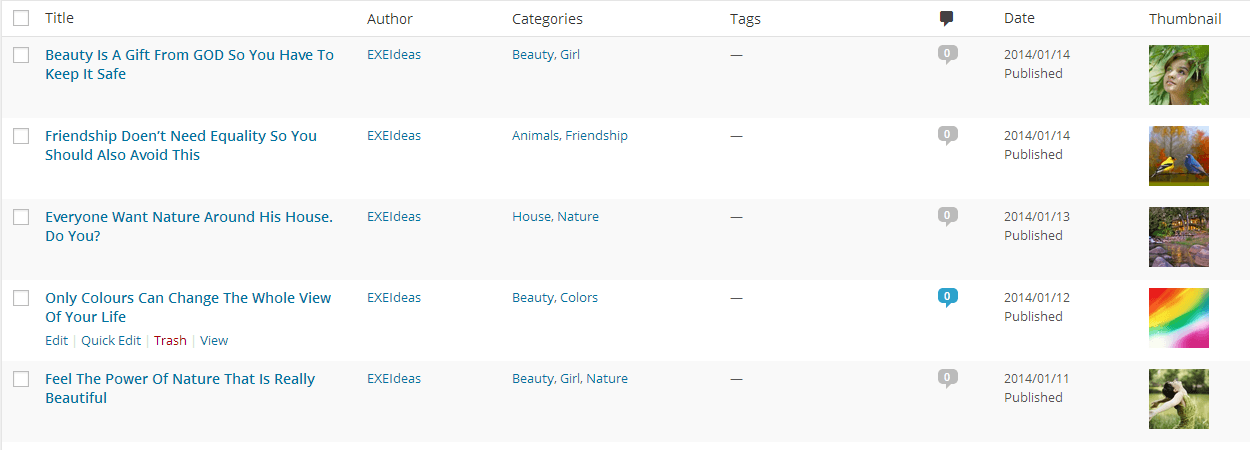
Now how you will feel if you will also able to see your featured post thumbnail in this line of post in your WordPress post dashboard. This will make you easy to know that which post have featured image or which not and if any have then what is that. Its quite easy to add this features so just follow what we say and you will get it in your any WordPress blog.
Table of Contents
How To Add Featured Image Thumbnails In WordPress Posts/Pages Editor Dashboard?
Step 1:) Open Appearance > Editor file in your WordPress dashboard.
Step 2:) Open your Theme Function (function.php) file from the list of your theme file.
Step 3:) Copy the below code and Paste it in the end of function.php file.
/* ------------------------------------------------------------------------- *
 *   How To Add Featured Image Thumbnails In Posts/Pages Editor Dashboard
/* ------------------------------------------------------------------------- */
if ( !function_exists ('AddThumbColumn') && function_exists ('add_theme_support') ) {
 // for post and page
 add_theme_support ('post-thumbnails', array( 'post', 'page' ) );
 function AddThumbColumn ($cols) {
 $cols['thumbnail'] = __('Thumbnail');
 return $cols;
 }
 function AddThumbValue ($column_name, $post_id) {
 $width = (int) 60;
 $height = (int) 60;
 if ( 'thumbnail' == $column_name ) {
 // thumbnail of WP 2.9
 $thumbnail_id = get_post_meta( $post_id, '_thumbnail_id', true );
 // image from gallery
 $attachments = get_children( array('post_parent' => $post_id, 'post_type' => 'attachment', 'post_mime_type' => 'image') );
 if ($thumbnail_id)
 $thumb = wp_get_attachment_image( $thumbnail_id, array($width, $height), true );
 elseif ($attachments) {
 foreach ( $attachments as $attachment_id => $attachment ) {
 $thumb = wp_get_attachment_image( $attachment_id, array($width, $height), true );
 }
 }
 if ( isset($thumb) && $thumb ) {
 echo $thumb;
 } else {
 echo __('None');
 }
 }
 }
 // for posts
 add_filter( 'manage_posts_columns', 'AddThumbColumn' );
 add_action( 'manage_posts_custom_column', 'AddThumbValue', 10, 2 );
 // for pages
 add_filter( 'manage_pages_columns', 'AddThumbColumn' );
 add_action( 'manage_pages_custom_column', 'AddThumbValue', 10, 2 );
}
Step 4:) Update file and done.
Step 5:) There you will the below image when you will open the post/page editor dashboard.
Customization:
You just have to change the thumbnail size of your featured post that you want to see in your post editor dashboard from code where you are seeing 60 in width and height. This will only edit the size in WordPress dashboard not in posts.
Last Words:
This is what we have and shared in easy steps for newbies so that they can easily know how it works. Stay with us because we are going to share a whole guide step by step about WordPress and make it easy for you. If you liked it then share it and be with us to get next tutorial. If you have any problem then feel free to ask us. We will help you with what we can or have.


Be the first to write a comment.