
In this article, you will learn about a simple file caching process using the PHP programming language. The cache is important because it improves the efficiency of data retrieval. It is a reserved storage location that collects temporary data to help websites, browsers, and apps load faster.
As we know, PHP is an interpreted programming language, which means the server has to execute the code each time a PHP page is requested. Instead of establishing a server connection every time we request the same page, we can store a copy of that page in an external file. Once this gets stored, we can call it from the stored location. This will reduce the server loading time and load the web page much faster.
Table of Contents
What Is Page Caching?
Page caching is a technique that seeks to create a collection of duplicate data when the original data is expensive to fetch or compute (usually in terms of access time).
As PHP is an interpreted programming language, the server has to execute the code each time a PHP page is requested. Depending on the complexity and length of the script, this operation can take time and demand lots of resources. If your website has a lot of traffic, it can really slow down your server and site.
What Is OpCode Cache?
An OpCode cache is a performance-enhancing extension that caches the result of the PHP code compilation to bytecode. Throughout PHP’s lifetime, there have been a number of OpCode caches available, mostly depending on the used PHP version.
How Do I Enable OpCode Cache?
As available OpCode caches depend on the PHP version used on your server, please get in touch with your web hosting provider to see how to enable OpCode caching on your site.
In this example, we are using the Output Buffer to cache the requested file. For this, first, create a folder ‘cache’ in the same directory where you will place the ‘index.php’ file. After that, create two files and copy and paste the following code.
In the below example –
ob_start()- This function activates output buffering.
ob_get_contents()- This function returns the contents of the output buffer.
ob_end_flush()- Use this function to disable output buffering.
This is the main file, that we will call in the browser. In this file, first, we include the ‘cache.php’, and then we check the already buffered data. If the condition is true, then display the buffered page on the browser, otherwise, start buffering and display the page.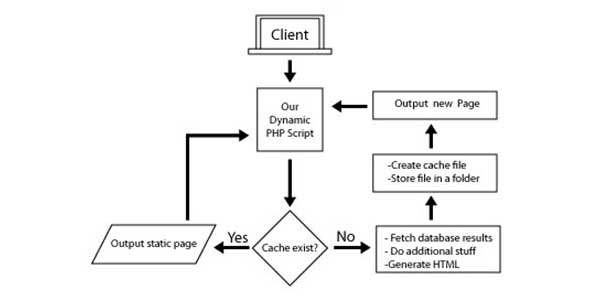
Features:
- Light Weight.
- Pure PHP.
- Cross Browser.
- No External Files.
- Fully Customizable.
- Compitable With All.
How To Add Simple And Quickest PHP File Cache Example With Auto Expirey?
There are a few easy and understandable steps to achieve your desired functionality that we are gonna share below. Follow each step perfectly.
Step One: Create The top-cache.php File
We need to create two files. Here’s the first one: Create a new file named top-cache.php and paste the code below into it.
<?php
$url = $_SERVER["SCRIPT_NAME"];
$break = Explode('/', $url);
$file = $break[count($break) - 1];
$cachefile = 'cache/cached-'.substr_replace($file ,"",-4).'.php';
$cachetime = 18000;

// Serve from the cache if it is younger than $cachetime
if (file_exists($cachefile) && time() - $cachetime < filemtime($cachefile)) {
    echo "<!-- Cached copy, generated ".date('H:i', filemtime($cachefile))." -->\n";
    readfile($cachefile);
    exit;
}
ob_start(); // Start the output buffer
?>
Step Two: Create The bottom-cache.php File
Now, create another new PHP file, named bottom-cache.php, and paste the code below in it.
<?php
// Cache the contents to a cache file
$cached = fopen($cachefile, 'w');
fwrite($cached, ob_get_contents());
fclose($cached);
ob_end_flush(); // Send the output to the browser
?>
Step Three: Include Cache Files On Your Page
Now that you have created the two necessary files, you simply have to include them on the PHP page you wish to cache.
As you probably guessed, the top-cache.php file must be included at the beginning of your PHP page and the bottom-cache.php at the end, as shown below:
<?php

include('top-cache.php');

// Your regular PHP code goes here

include('bottom-cache.php');
?>
Customization:
No need to customize it. Just copy-paste. Rest edit the code as per comments and need.
Troubleshooting the Errors:
Do it with concentration and patience. Check your all steps again and all codes or scripts. If you find any error you can contact us anytime via comment or better via email, We are always here to help you.
Final Words:
That’s all we have. We hope that you liked this article. If you have any problem with this code in your template then feel free to contact us with a full explanation of your problem. We will reply to you as time allows us If you have any doubts or problems please comment below. We are happy to help you! If you liked this article, Don’t forget to share this with your friends so they can also take benefit from it and leave.


Be the first to write a comment.