

Congratulation on your Plugin approval. Now the next step is to know that How to upload a plugin to the WordPress SVN repository. For this purpose, here we have a clean and simple guide that will help you step by step to upload your plugin to the WordPress SVN repository. Before reading this guide, we think that you have already developed your WordPress plugin, submitted a request to the directory, and received the approval email. Before reading this guide, make sure that you have the following data. You will need:
- The approval email – detailing the SVN address and login for the plugin
- A copy of the plugin
- A copy of the readme.txt
- TortoiseSVN installed (make sure you select the right version for your operating system – 32-bit or 64-bit)
Table of Contents
How To Publish A New WordPress Plugin?
Now follow the below steps line by line.
Step 1:) First of all, check your WordPress approval email that will contain SVN URL including ID and Pass for login like follows.
https://plugins.svn.wordpress.org/my-name-of-plugin
Step 2:) Now create a suitable location on your computer to store your copy of your plugin forever as WordPress will link and sync that folder with their SVN repository. We suggest you create a new clean folder so it doesn’t get confused with your other files and folders. For example, in your Documents folder create a folder called wp-plugins and under wp-plugins create another folder with the name of your plugin, taken from the above address.
Step 3:) Right-click on the new folder and choose SVN Checkout.

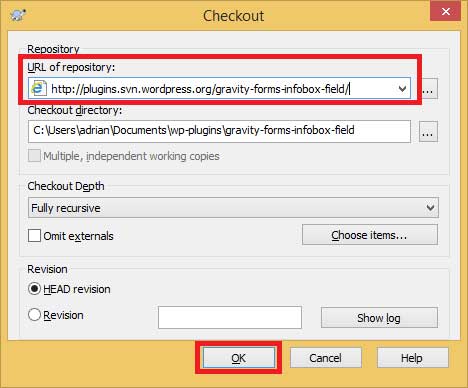
Step 4:) A new window will open, under URL of repository enter the full URL as provided in the approval email then click OK
Step 5:) The directories from the SVN repository will now download to your computer. As it’s a new plugin the folders will be empty.

Step 6:) Click OK to close the window.
Step 7:) The two folders you need to know are:
- Trunk – this is where the latest version of your plugin lives. You can maintain the files from here and commit the changes when they’re ready.
- Tags – this is where the revisions of your plugin live. You will never need to modify the files in this folder, these are your backups for each version of the plugin.
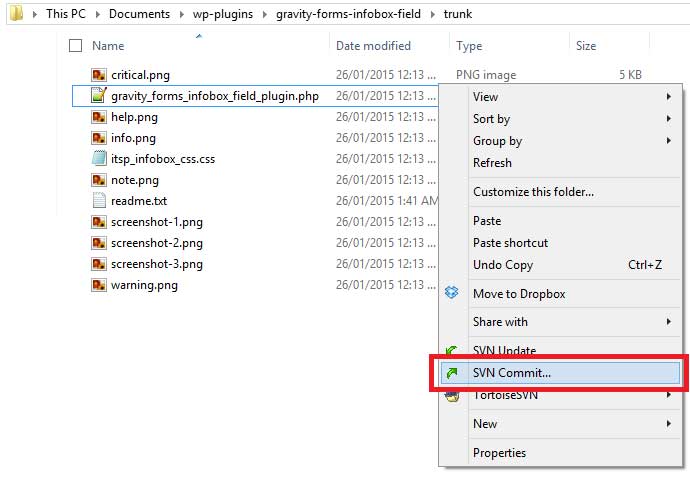
Step 8:) Open the Trunk folder and copy ALL your plugin files and folders (PHP, CSS, js, etc) as well as your readme.txt (note, your screen-shot images can go to the ‘assets’ folder)
Step 9:) Now right-click in a blank area and choose SVN Commit
Step 10:) In the top text box enter a message to note the update, for example, ‘Version 1.0 – First public release’
Step 11:) In the bottom box check all the files (If you see thumbs .db – do not tick it, this is a Windows system file, nothing to do with your plugin)

Step 12:) Click OK
Step 13:) You will now be prompted for your username and password – this is the same username and password for the WordPress forum and website
Step 14:) Enter the username and password and click OK
Step 15:) The files will now upload from your computer to the repository. You will see the update log on the screen and a bold Completed message once it’s done. You will also receive an email from WordPress confirming the plugin has been uploaded.

Step 16:) Click OK to close the window.
Step 17:) The plugin is now publicly available from the WordPress directory – however, there is one other step that is highly recommended – adding a revision to the tags directory.
Note: Add Revision To “tags” Directory:
Step 1:) From the trunk folder, right-click in a blank location and choose TortoiseSVN – > Branch/tag

Step 2:) In the To path folder, change the location from /trunk to /tags/<version number> For example
/my-name-of-plugin/tags/1.0
Step 3:) Enter a revision comment, e.g. version 1.0 – first public release

Step 4:) Click OK
Step 5:) You will now be prompted for your WordPress username and password again – this is the same username and password for the WordPress forum and website
Step 6:) Once done you will see a message like this

Step 7:) Click OK to close the window
Step 8:) You can now go into the tags folder, right-click and choose SVN Update – this will download all the revisions (or the one you just uploaded) to your computer.
Conclusion:
This is a simple guide that we try to share with you step by step to help you out to acheive this for what you are here. If you like this and get it solved what your problem is, feel free to share with others too. If have any problem, feel free to leave your quires and your feedback also. Will see you on next post.


The blog is very awesome and interesting as well. Thanks for sharing the blog.
Welcome here and thanks for reading our article and sharing your view. This will be very helpful to us to let us motivate to provide you more awesome and valuable content from a different mind. Thanks for reading this article.
The blog is really fantastic and fascinating. I appreciate you sharing the blog.
Welcome here and thanks for reading our article and sharing your view. This will be very helpful to us to let us motivate to provide you with more awesome and valuable content from a different mind. Thanks again.
To upload a plugin to the WordPress Plugin Directory, create a WordPress.org account, prepare your plugin, and submit it via the Plugin Developer portal. Follow guidelines for approval and listing.
Welcome here and thanks for reading our article and sharing your view. This will be very helpful to us to let us motivate to provide you with more awesome and valuable content from a different mind. Thanks again.