
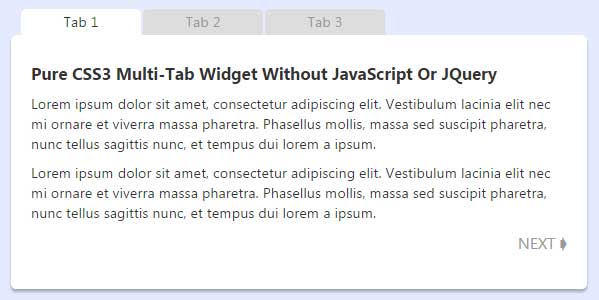
Multi-Tab widgets are important to see more same type data is less space of your web page. So if you will use high end coding like jquery then it will make your load time more high so you will not able to add ore data in tabs due to load time. So here we have an attractive animated tab control using HTML5 and CSS3. You won’t need JavaScript or images and it works in IE9, Chrome, Firefox, Safari and Opera.
Now here we are sharing a pure css3 multi tab widget that can contain unlimited tab and any type data ain these tabs so it will not make your web page load time heavy and will contain more data and same space more then your webpage have now.
So without any more preface, just check out features then see the live DEMO, after liking it, go for the code and just copy paste and it will work.
Table of Contents
Features:
1.) Pure CSS3 Code.
2.) No JavaScript Or JQuery.
3.) HTML Tags Used.
4.) CSS3:target Selector Used.
5.) CSS3 Transition Added To Make Awesome.
6.) Simple And Easily Coding.
7.) Full Customizable.
8.) Can Add More Tabs.
9.) Work With CSS3, HTML5 Compatible Browser.
10.) Quick To Load Without Intercepting.
Pure CSS3 Multi-Tab Widget Code:
Copy the below code and paste where you want to show it.
<style type="text/css">
// Pure CSS3 Multi-Tab Widget Without JavaScript Or JQuery
p.tabnav{font-size:1.1em;text-transform:uppercase;text-align:right}
p.tabnav a{text-decoration:none;color:#999}
article.tabs{position:relative;display:block;width:40em;height:15em;margin:2em auto}
article.tabs section{position:absolute;display:block;top:1.8em;left:0;height:12em;padding:10px 20px;background-color:#ddd;border-radius:5px;box-shadow:0 3px 3px rgba(0,0,0,0.1);z-index:0}
article.tabs section:first-child{z-index:1}
article.tabs section h2{position:absolute;font-size:1em;font-weight:400;width:120px;height:1.8em;top:-1.8em;left:10px;padding:0;margin:0;color:#999;background-color:#ddd;border-radius:5px 5px 0 0}
article.tabs section:nth-child(2) h2{left:132px}
article.tabs section:nth-child(3) h2{left:254px}
article.tabs section h2 a{display:block;width:100%;line-height:1.8em;text-align:center;text-decoration:none;color:inherit;outline:0 none}
article.tabs section,article.tabs section h2{-webkit-transition:all 500ms ease;-moz-transition:all 500ms ease;-ms-transition:all 500ms ease;-o-transition:all 500ms ease;transition:all 500ms ease}
article.tabs section:target,article.tabs section:target h2{color:#333;background-color:#fff;z-index:2}
</style>
<article class="tabs">
<section id="tab1">
<h2><a href="#tab1">Tab 1</a></h2>
<p>This content appears on tab 1.</p>
<p>Lorem ipsum dolor sit amet, consectetur adipiscing elit. Vestibulum lacinia elit nec mi ornare et viverra massa pharetra. Phasellus mollis, massa sed suscipit pharetra, nunc tellus sagittis nunc, et tempus dui lorem a ipsum.</p>
<p class="tabnav"><a href="#tab2">next ➧</a></p>
</section>
<section id="tab2">
<h2><a href="#tab2">Tab 2</a></h2>
<p>This content appears on tab 2.</p>
<p>Fusce ullamcorper orci vel turpis vestibulum eu congue nisl euismod. Maecenas euismod, orci non tempus fermentum, leo metus lacinia lacus, nec ultrices quam ligula ac leo. Quisque tortor neque, vulputate quis ultricies ut, rhoncus mollis metus.</p>
<p class="tabnav"><a href="#tab3">next ➧</a></p>
</section>
<section id="tab3">
<h2><a href="#tab3">Tab 3</a></h2>
<p>This content appears on tab 3.</p>
<p>Sed et diam eu ipsum scelerisque laoreet quis in nibh. Proin sodales augue lectus. Maecenas a lorem a mi congue pharetra. Sed sed risus in nisi venenatis condimentum. Donec ac consectetur arcu. Integer urna neque, rutrum at pretium eu.</p>
<p class="tabnav"><a href="#tab1">next ➧</a></p>
</section>
</article>Customization:
You just have to change text inside the <section></section> div with your desired data. YOu can also change it width or height or colors and all things if you know about it.
Last Words:
This is what we have and shared in easy steps for newbies so that they can easily know how it works. Stay with us because we are going to share alot more about coding and make it easy for you. If you liked it then share it and be with us to get next awesome widget. If you have any problem then feel free to ask us. We will help you with what we can or have.


Be the first to write a comment.